This is a great project to create a rear fill behind your
cemetery. This is almost exactly the same way that Disneyland projects
their ghosts in their cemetery.
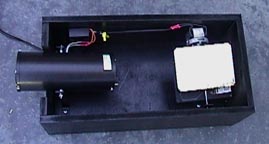
The first thing you need to do is build a box to house the entire project.
Once the box is built and painted you will need to take the holiday projector
apart completely and mount it to the mounting braces. To make the mounting
braces bend 4 of the metal bars into "L" shapes so they are 6" high with
a 2" bottom. Take 2 of the braces and mount them to the projector tube
with 1.5" bolts.
Now take the 2X4 and drill it diagonally through the exact centerand mount
the mirrors to each side. Now take the metal rod and thread it so you
can connect the rod to the motor shaft. You will now need to thread the
motor's shaft and mount the motor to the last 2 braces so that the shaft
is at exactly 5 inches.
Now you are ready to mount the rod to the motor shaft and put the projector
back together. Once that is done, you are ready to mount everything into
the box and test it out. Once everything runs smoothly, your will need
to make a negative slide with a ghost image drawn or painted onto it.
I recommend printing it out on a clear sheet of transparency paper. This
way you print a bunch of them in the same time it would take to paint
one.
After mounting the slide into the projector your ready to roll. The projector
works best if it projects onto a sheer material such as bridal veil fabric.
The transparent fabric will make the edges of the ghost disappear and
make the ghosts look more natural.