The thrashing corpse was supposed to be a real quick and easy prop to add a scare right up in the viewers face. The concept was concocted off of a caged skeleton prop that was displayed at TW ’02. That design incorporated the bars themselves to have the mechanics attached and the skeleton went along for the ride. It also was a motor driven prop, so when the top hinged door was activated it moved the base and slammed it into another bar, causing a lot of noise and drowned out the voice. My design integrated all mechanics into the chest of the corpse, which gave the freedom of random placement. It was also pneumatic, so the actions are extremely controlled, and much more realistic.
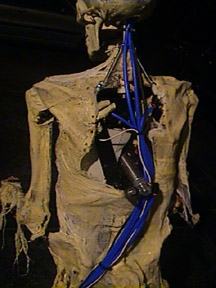
The Thrashing Corpse’s mechanics consist of a 1” cylinder to control the mouth movements, a 90 degree bimba rotary cylinder in the shoulder cavity to control head pan, and a 6” 1.5” bore cylinder in the chest to control the arm movements.
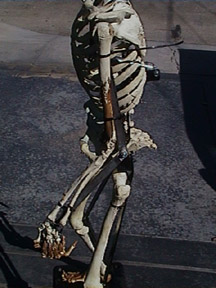
The entire skeleton was hacked up, and a metal frame was constructed. The frame was then secured to a 1” thick steel plate which stabilized the entire prop as well as attempted to keep it in place. Once the frame was in place, the skeleton was then re-introduced, and the shoulder assembly was welded into the frame. We originally tried to get away with lock nuts for the assembly, but the violent thrashing I demanded loosened p everything and it was back to the drawing board. After a couple quick welds, and a new torso (the first one went up in flames, which reminds me to warn against welding near a bucky, apparently their flammable), we were ready to test. The new welds held perfectly and the thrashing began.
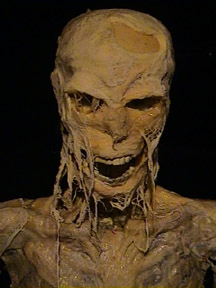
The next step was the head and jaw. I took the bucky skull and built a custom bracket to house a small cylinder that attached the head and jaw mechanism to a rod that connected too the rotary cylinder at the base of the neck. I originally designed the jaw to drop, but after a couple trial and error attempts, I came across the idea of keeping the jaw attached to the neck and have the entire head tilt back, which looked much more lifelike and got away from the whole toy like movement of a “talking boris skull”.
Once the head, jaw, neck and arms worked to my liking, it was time to add the sound and move to the final step of corpsing. For the sound I simply placed a amplified computer speaker in the chest cavity, and ran the cabling down the frame and out to an extended rca cable. Quick and painless, and still provided sound from within the body to give the effect the sound was from within and not from around the perimeter. The second control speaker was placed behind a wall, and volume control was controlled from there.
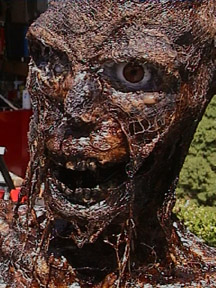
My last step before control was corpsing the bucky and covering the steel frame. I have always used fiberglass cloth in conjunction with liquid latex to create my corpses, but thanks to Tom Marchak owner and designer of Mechanical Mayhem, he supplied me instructions for corpsing using cheesecloth, latex, and a final coat of household oil based wood stain. This was the easiest most fun and extremely effective technique I have ever come across. Thanks Tom!
* Note - There are many different forms of corpsing, but this and Steve Hickman’s (Terror Syndicate) instructions are far superior to anything I have ever come across, and I highly recommend them. Steve also has a corpsing video, which is extremely informative for first time instructions. For more details on corpsing, check out my section for corpsing instructions and product recommendations.
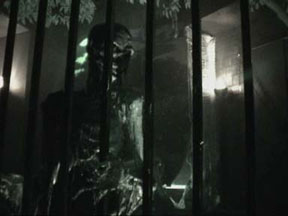
So besides hooking it up to the 3 solenoids and a stamp board, that was about it. We bolted his hands to our metal gate, plugged him in, started the sequence and he was ready for action. Oh the stamp board also controlled a radio shack 20sec digital voice recorder, which provided the sound output. So that’s about it. Check out the pics and video below.
 |
|
 |
|
 |
|
 |
|