By DreadNight
By DreadNight
No doubt youÌve heard
the old adage..... Ïsuccess is 10% inspiration and 90% perspiration!Ó
Well, that may be true most of the time, but sometimes in the haunt biz,
the hard work and perspiration would never have happened without the inspiration.
If youÌre like most Home Haunters, youÌll often find yourself inspired
by some awesome piece of ghoulish creativity that you see on the web, in
a catalog, or in a publication like ÏHaunted AttractionÓ. That was
exactly what happened to me when I first spied a real Ïknock your socks
offÓ prop piece in the pages of this magazine. The item in question
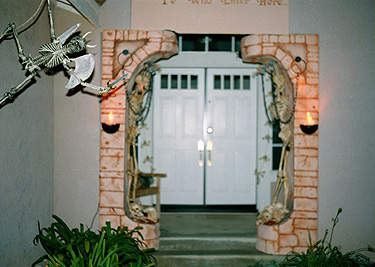
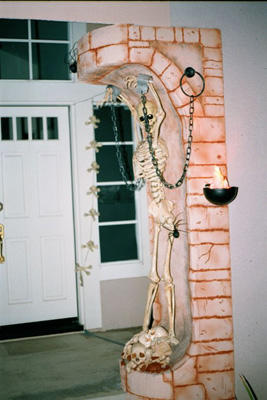
consisted of a life-sized pillar from what looked like a part of a castle
dungeon, complete with the skeleton of some wretched ancient, shackled
to the wall where he no doubt died a lingering death! I was
truly Ïinspired Ó. Soon after, I saw the item in a catalog, this
time with itÌs price tag that left me short of breath and realizing that
I would never be the proud owner of this piece.
For months, IÌd return to that issue of HA to stare at this beautiful,
gothic set piece. The more I looked at it, the more I realized that
if I broke this thing down into itÌs basic components and applied some
of our favorite amateur ÏtechnologiesÓ, like Terror SyndicateÌs Monster
Mud and a Bucky skeleton from Anatomical, I could actually put together
something at least similar for my annual (and completely non-profit) haunt.
The trick-or-treaters would be blown away!
Putting pencil to paper, I started to draft up my plan. My typical
California subdivision home includes a double front door, with two steps
leading up into the front portico that surrounds the door. I knew
I would want one of the pillars on each side of the entry, so that the
skeletal souls would gaze down upon my visitors from either side as they
worked up the nerve to continue to the door. The height of the portico
entry at the steps is about eight feet, which looked very close to the
size of the store-bought model, but I would have to modify mine because
the base would have to allow for the steps as they could not sit flat on
the ground.
OK, here goes. This
is the materials list for ONE pillar, so if you want the opposing pair
like I did, you will need to double the quantity:
One 4x8 sheet of 1/2 inch
polyfoam board
About 40 to 48 feet of redwood
lathe. I found mine in 8 foot lengths
10 feet of 1" x 2" white
pine, or other suitable "heavy" wood
Big handful of "L" brackets
and corner brackets, with holes suitable for 1/4"
wood screws
1 box small wood screws,
no more than 1/2" length
long
Box of 1 inch finish nails,
or even the small brads used to hang small
pictures on a wall
1 Roll chicken wire
1 Tube Liquid Nails for
foamboard
1 5 gallon bucket of joint
compound
1 gallon of latex paint,
color to suit your taste for the pillar itself
1 roll of aluminum flashing,
approx. 6 inches wide
1 Bucky skeleton, unless
you have a real skeleton in your closet
1 Boris skull if you want
the talking feature
1 Bathroom hand towel ring,
plastic
3 feet of plastic chain
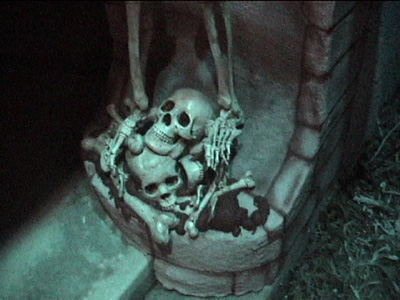
As much loose skull &
bone stuff as you want to put at Bucky's feet
I also decided that my pillar would be modified by grafting a ÏTalking
through BorisÓ skull onto one of the Bucky skeletons, so that I could run
the microphone wire into my house and have one of these spectral prisoners
speak to the trick-or-treaters as they approached the door.
Basically, I saw three major efforts. The first step would be to
build the frame to provide enough support for Bucky and give the pillar
the right shape. The next step would be to use a combination of foamboard
and Monster Mud to give the pillar itÌs texture and stone look. Finally,
hang Bucky and mount the Boris talking head.
The frame had to be lightweight yet strong. I knew I might or might
not have help putting these in place for Halloween and I didnÌt want to
complete the first one only to find out IÌd need a forklift to move it
from the garage! I settled on 1 X 2 white pine for the base pieces
of the frame (the portion on the ground and encasing the stair steps),
with very light redwood lathe strips for all of the uprights and cross
pieces. The pine gave me the sturdiness required for the base, and
the lathe kept it as light as possible.
The pieces forming the base were put together using metal ÏLÓ brackets,
both flat and corner types. Again, this was to give the base greater
strength and ensure it would last through the years. Once the base
was complete, the long lathe uprights and connecting framework was assembled
using finishing nails and Liquid Nails type glue. ItÌs important
to use the smallest possible nails and wood screws because the lathe will
split if you donÌt. In fact if you feel the lathe may split, a little
ordinary auto wax on the nail will keep that from happening.
After the basic structure
is complete, I cut two semi-circular shapes from sturdy cardboard.
These were attached with a hand-staple gun to the upper and lower front
edge of the overhangs, to form the circular front parts of the stone pillar.
Regular 1Ó chicken wire was then wrapped around, conforming to the curve
of the cardboard, and staple gunned to the lathe on the sides and wired
to the cardboard itself. I then used the chicken wire to cover the
entire length of the structure, to form the wall behind the skeleton and
the Ïceiling and floorÓ of the overhang and base.
At this point, you are ready to start adding some real texture to this
creation. First, 1/2Ó extruded polystyrene sheet was cut to fit along
the sides of the wall. One 4 x 8 sheet will take care of both sides
of a pillar. Once cut to shape, these were attached with ÏLiquid
NailsÓ type glue for foamboard, putting the glue on the lathe and setting
weights on the foamboard while laying the whole structure on itÌs side.
Once itÌs dried, pull out the soldering iron and start to create the stone
wall look by ÏmeltingÓ the mortar lines into the foam sidewalls (as always,
do this in a well ventilated area - we know about those burning Styrofoam
vapors...). Add as much detail as youÌd like, with pits, scratches
and chunks gouged out of these old dungeon walls.
Next was my first venture into the use of ÏMonster MudÓ, or burlap dipped
in joint compound. No need to color the compound, since overall coloring
will be added soon. I used the Monster Mud to cover the circular
front overhangs and base, and the curved wall area, which ends up behind
the skeleton. I must say I was even more impressed with Monster Mud
than I thought I would be.... the stuff is just fantastic for itÌs hardness,
ability to be painted and molding to any shape. Keep the structure
on the floor and lay it face up to do this step and to allow the Mud to
harden.
Your foamboard is on, the Monster Mud is dry and youÌve basically got the
pillar shape youÌre going for. Time to get artistic! An overall
coat of your base color goes first - latex paint applied with a roller.
I imitated the light beige or tan color I had seen in the catalogs, mostly
because it would match the stucco of my house perfectly. I had wondered
why the catalog items werenÌt done in ÏcastleÓ gray but later, as I airbrushed
the stone crevices and details in a dark reddish-brown color, I realized
that it gave the overall effect of blood oozing from between each separate
stone! Perfect.
This is the time to go wild with your weathering effects. I used
a mixture of ground charcoal and black tempera (in itÌs powdered form)
to do the shadowing and ÏagingÓ of the stone and to shadow the area behind
Bucky as he hangs in manacles. The older and more gothic looking
the pillars is, the better.
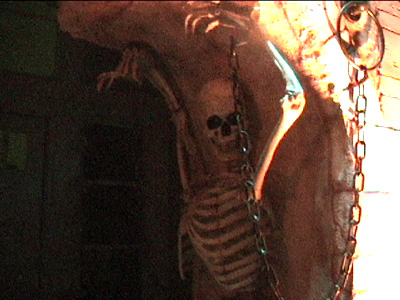
During my breaks,
I had been aging the Bucky as well, using the Minwax Gel Stain to get that
gnarly rotted bone look we all love so much. The manacles were fashioned
from aluminum ÏflashingÓ; a very thin metal youÌll find on a roll at Horror
Depot or equivalent. It is normally used on homes around gutter areas
or to protect against moisture where wood is located. Just cut a
strip to size, bend it half-over to give it more thickness, then hammer
the heck out of it to make it look old and beat up. I used my own
hand to get the dimensions right for BuckyÌs wrist. The chain on
the manacles is a plastic one from my local hardware store, painted flat
black and weathered with gray and silver, dry-brushed on.
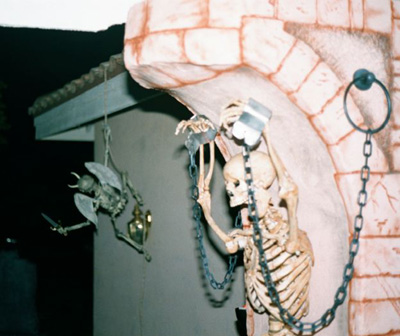
If your Bucky and his manacles are ready, itÌs time to mount him to the
dungeon wall. I tried at first to use a ÏUÓ-bolt, but had trouble
finding one large enough to go around the spine, through the mounting board,
and attach to the nut at the back. I decided to go with two ÏJÓ hooks,
hooking each one around the base of a thick rib, just on either side of
the spinal column. They worked great, and I just tightened down the
nut until he felt securely hoisted into position. Attach your manacle
rings, wire the manacles firmly to the "rock" ceiling overhead and put
BuckyÌs tortured wrists through. Done!
As I mentioned, I
added the feature of replacing the Bucky skull with a ÏTalking through
BorisÓ model. Be careful when you modify Bucky. YouÌll find
you may have to remove the top five or six vertebra and saw off about 6
inches of the metal rod going to his head in order for the Boris to fit
on and look right. You can use a Dremel type tool and cutting wheel
to cut through the rod. When you do this, the spinal column may want
to start slipping out through the bottom (pelvis) since the anchor nut
at the top is gone. I used wire at the bottom of the pelvis to prevent
this and hold everything in place.
Position the Boris skull the way you need it. In my case I angled
it to be looking roughly at someone ten years old or so, coming up my walkway.
Use an anchor screw into the back of the skull from behind the dungeon
wall if you need to, to hold the skull at the correct angle.
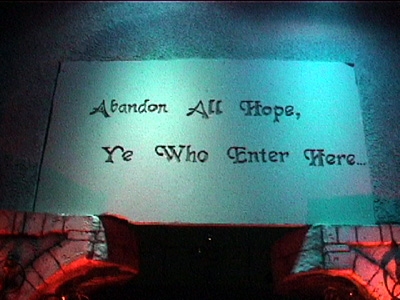
ThatÌs it. Now to add some low lying ground fog through a fog chiller,
blue graveyard lighting and the appropriate background music.....
I canÌt wait!